Episode 6b continues where 6a ended. In 6a we ended with doing a VSTS Build which pushed docker images to the Azure Container Registry (ACR). In this 6b pos we will use VSTS to setup Continuous Delivery in order to deploy the WebApp as a container app from ACR into the managed Azure Kubernetes Service (AKS).
Continuous Delivery – VSTS Release
VSTS Release is about taking the published artifacts from the Build step and deploying them to an environment. In VSTS you build a pipeline of tasks and the steps we need are quite simple:
- Modify the YAML deployment file so that certain tokens matches the ACR/AKS target.
- Deploy the app to Kubernetes
In the first step, we need to modify the generic YAML file and replace tokens with the name of our Azure Container Registry, but where do we get that name from? Well, it’s easy in Azure CLI if we know the Resource Group name and the name of the ACR. The ACR name we select in a drop down box in configuring step 2, but here we need it in step 1 already.
az acr show --resource-group $RGNAME --name $ACRNAME --query "loginServer" --output tsv

# output
cljungaksacr.azurecr.io
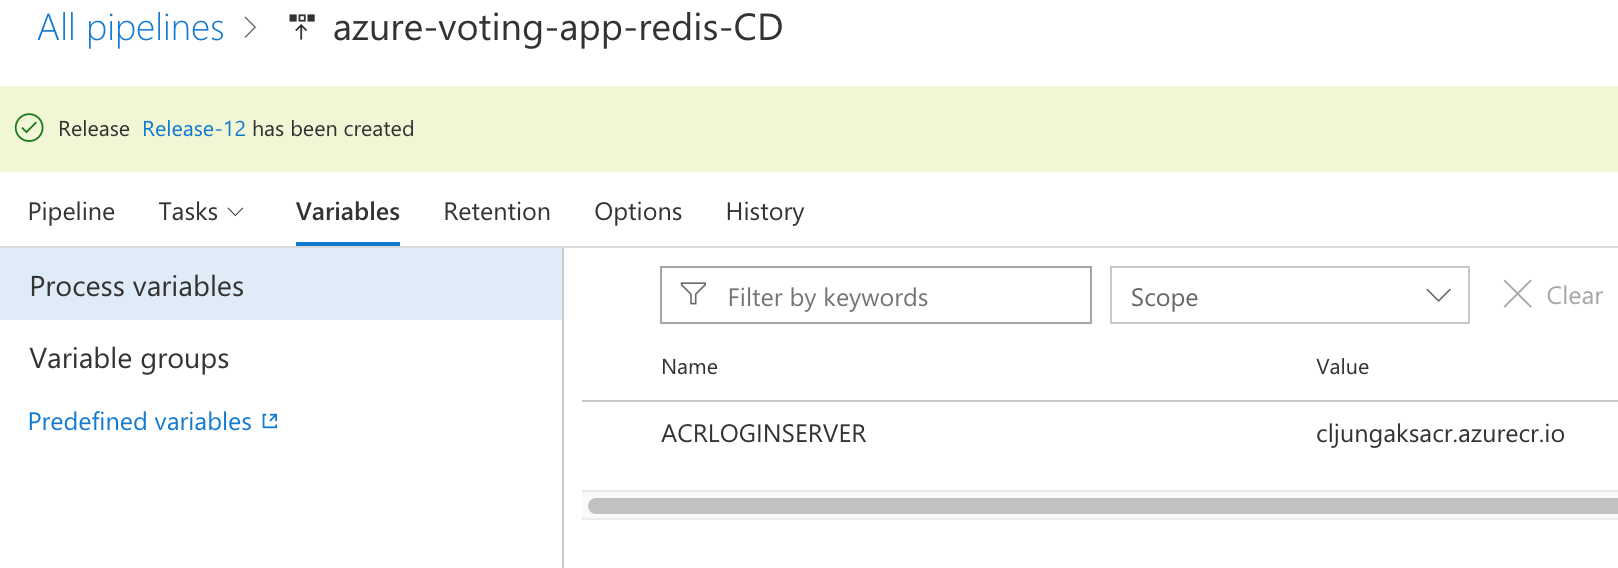
To not make this a bigger problem than it is, I reverted to the use of VSTS Variables and created one called ACRLOGINSERVER. I could have added a pipeline task that executed the Azure CLI command above in order to get this info, but to me that was overly complicated
Create the Release Pipeline
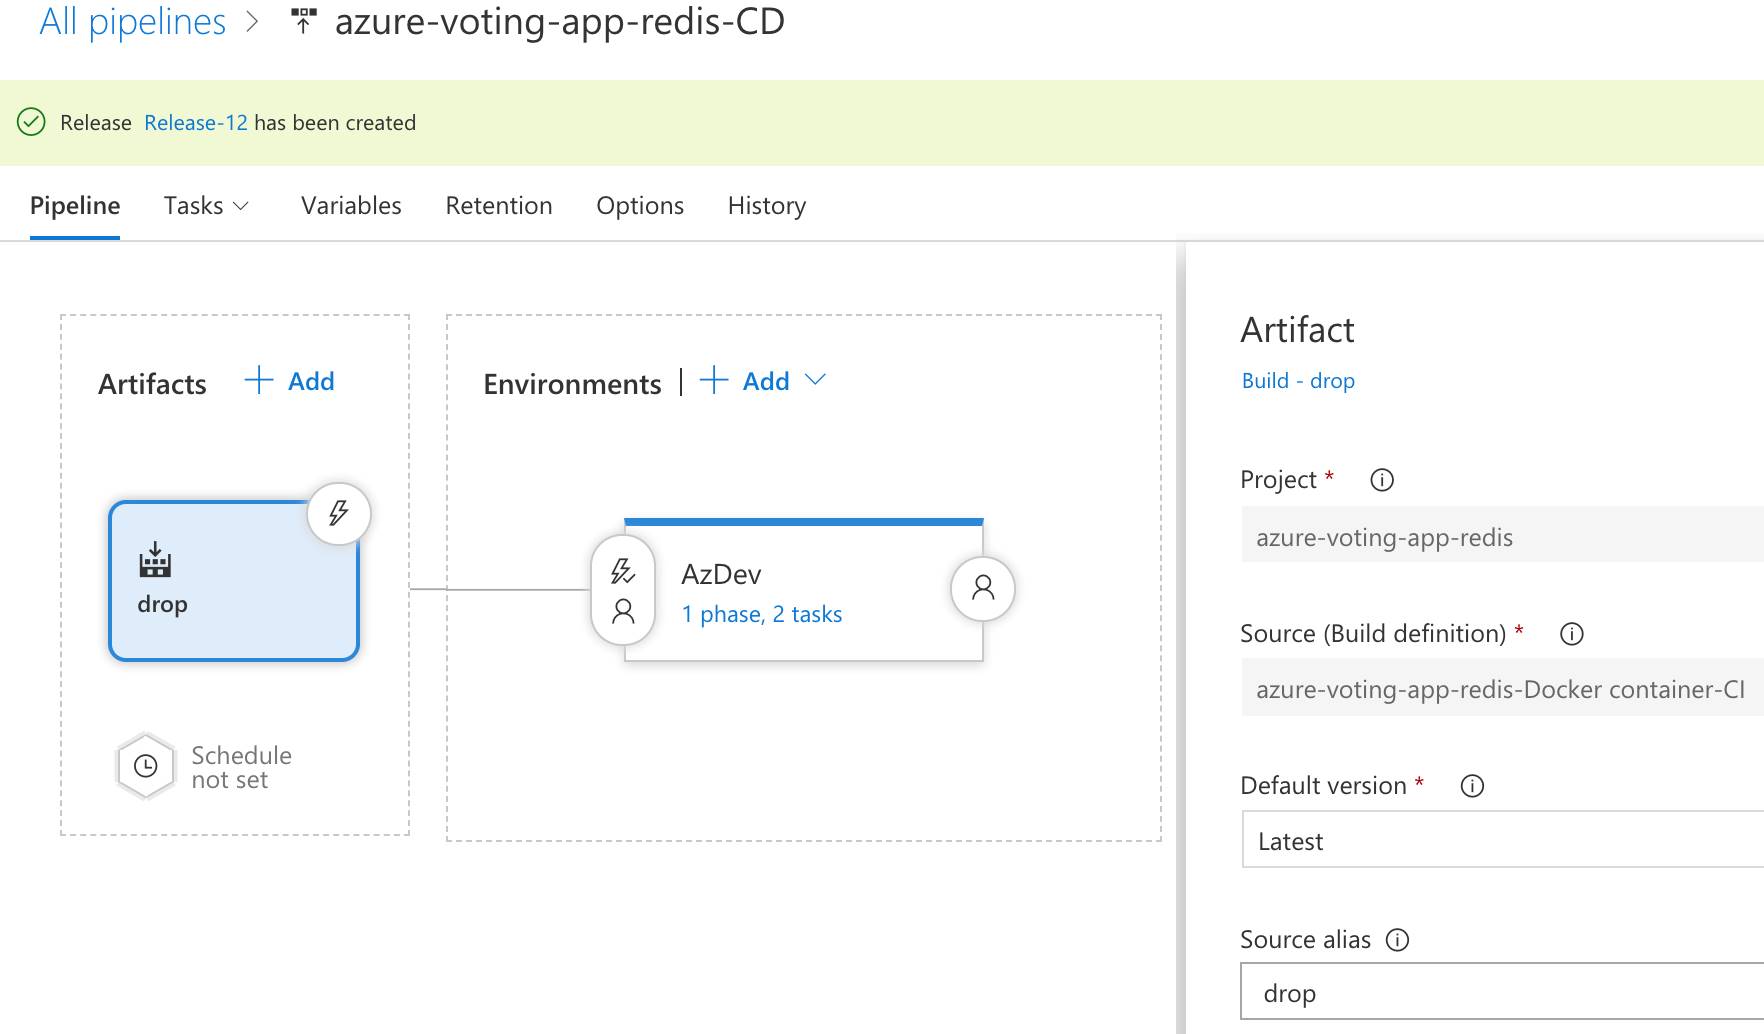
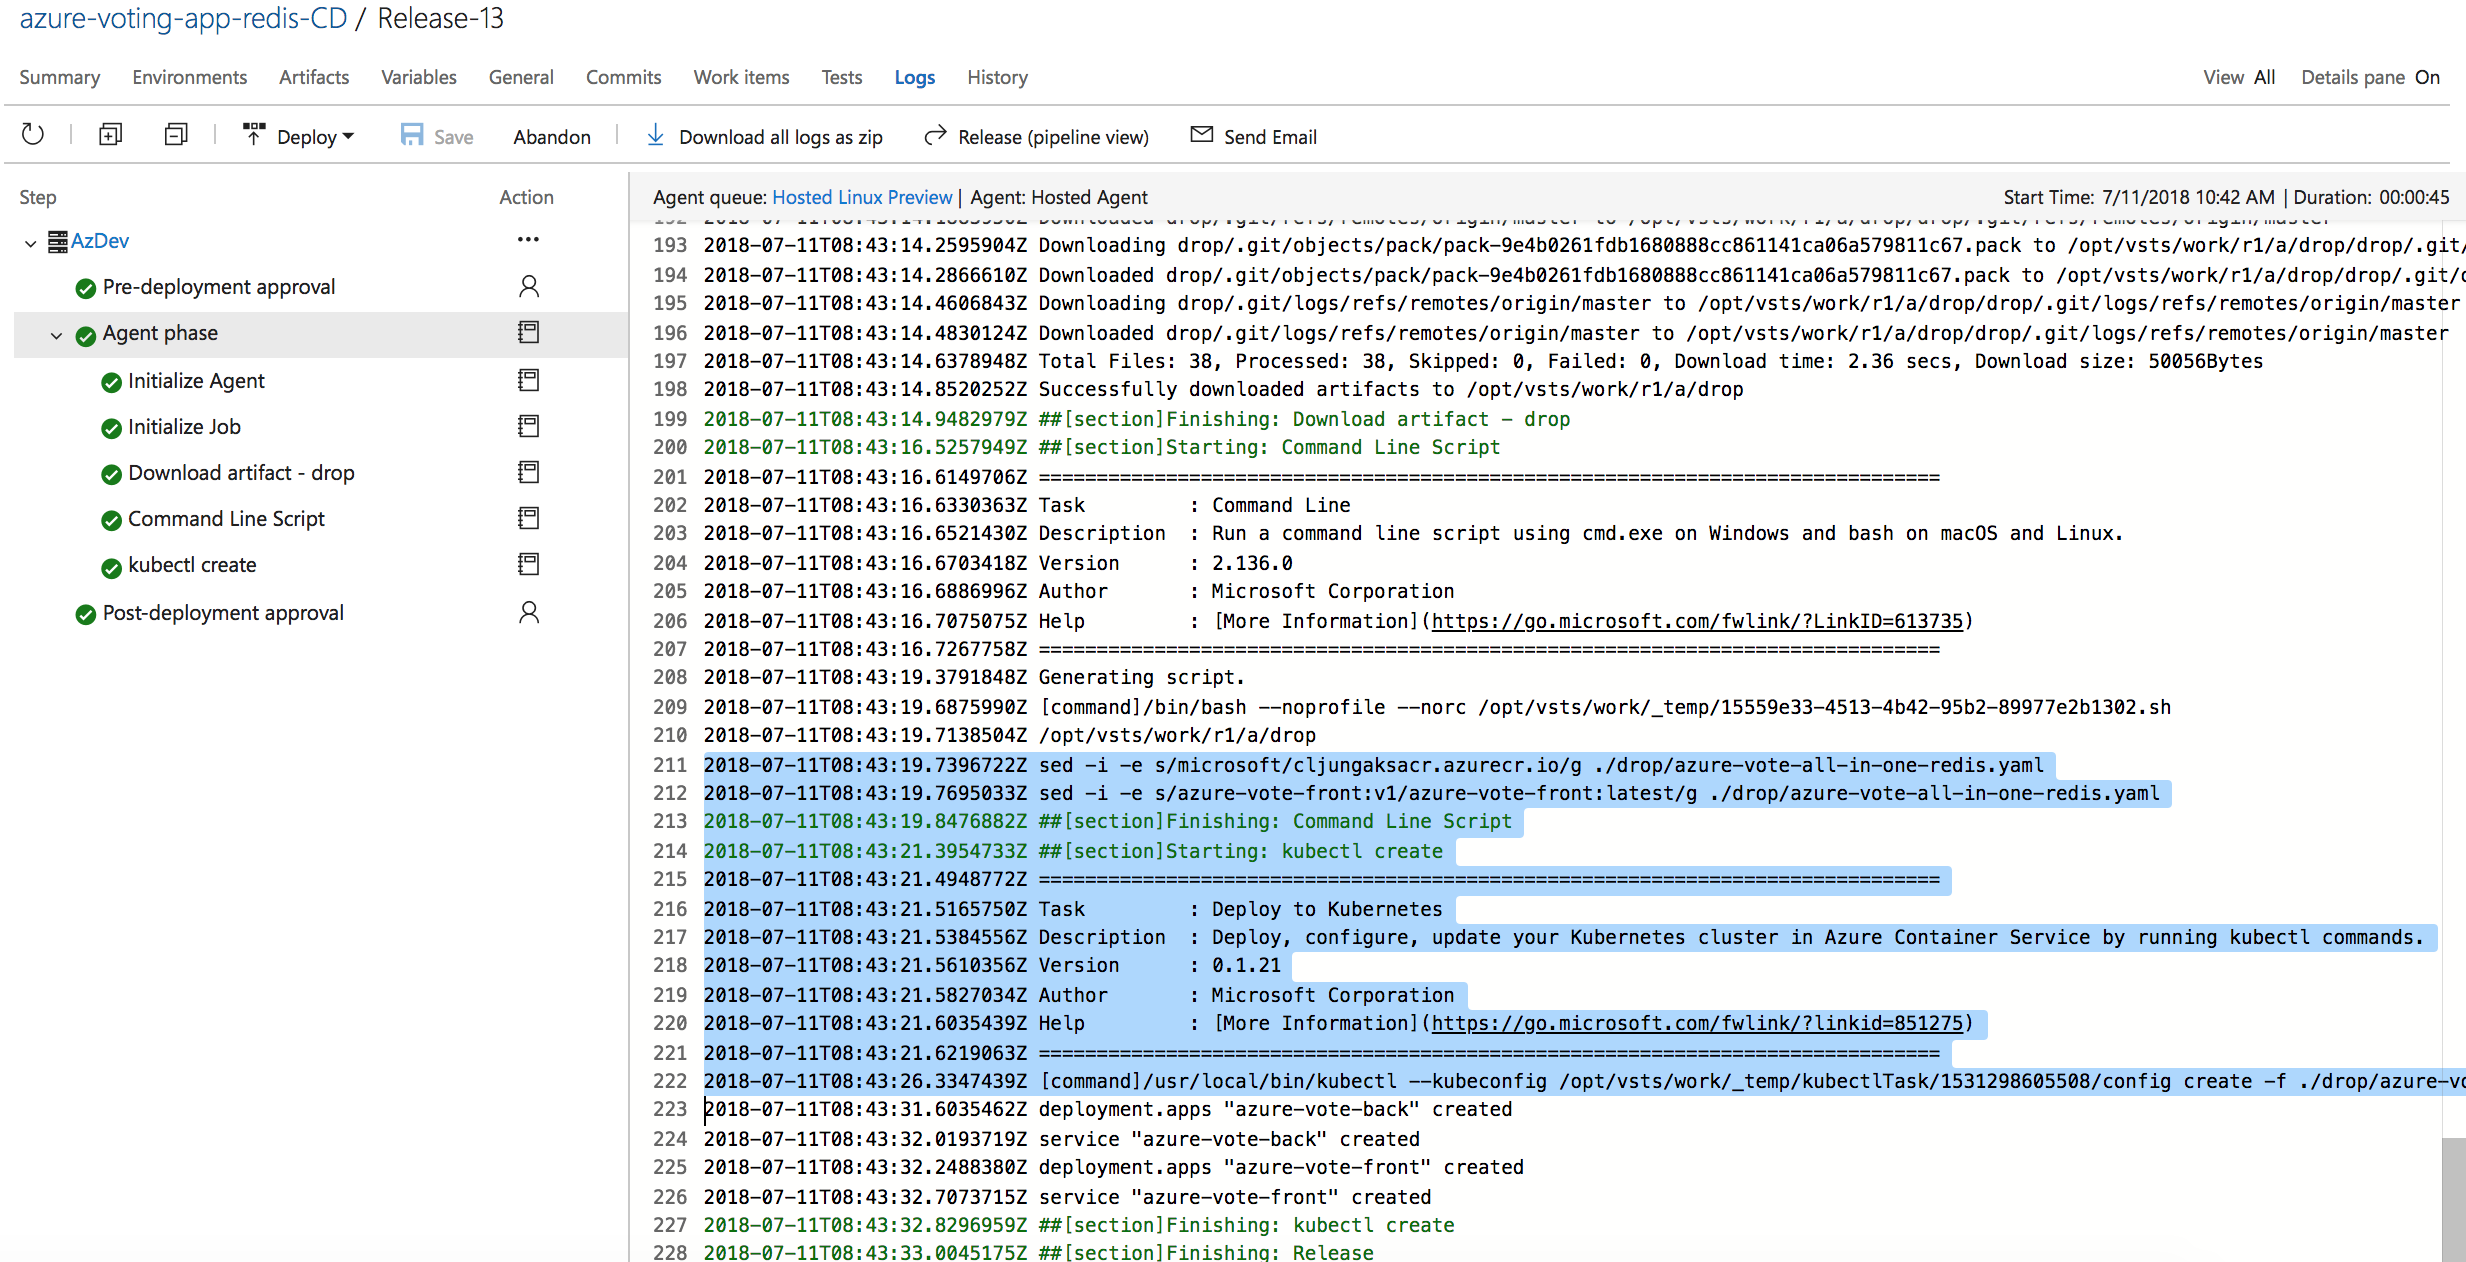
Create the Release pipeline and hook it up to the drop from the Build step, then we add the two tasks where the first is a Command Line Script and the second is a Deploy to Kubernetes task.
Modify the YAML file
Since we are using the Hosted Linux agent in VSTS, we can take advantage of that and use some bash commands to do the token replacement in the YAML file. The “sed” command is perfect for this task and we replace the token “microsoft” with whatever we have in the VSTS variable ACRLOGINSERVER (VSTS puts that value into an environment variable when the step is executed).
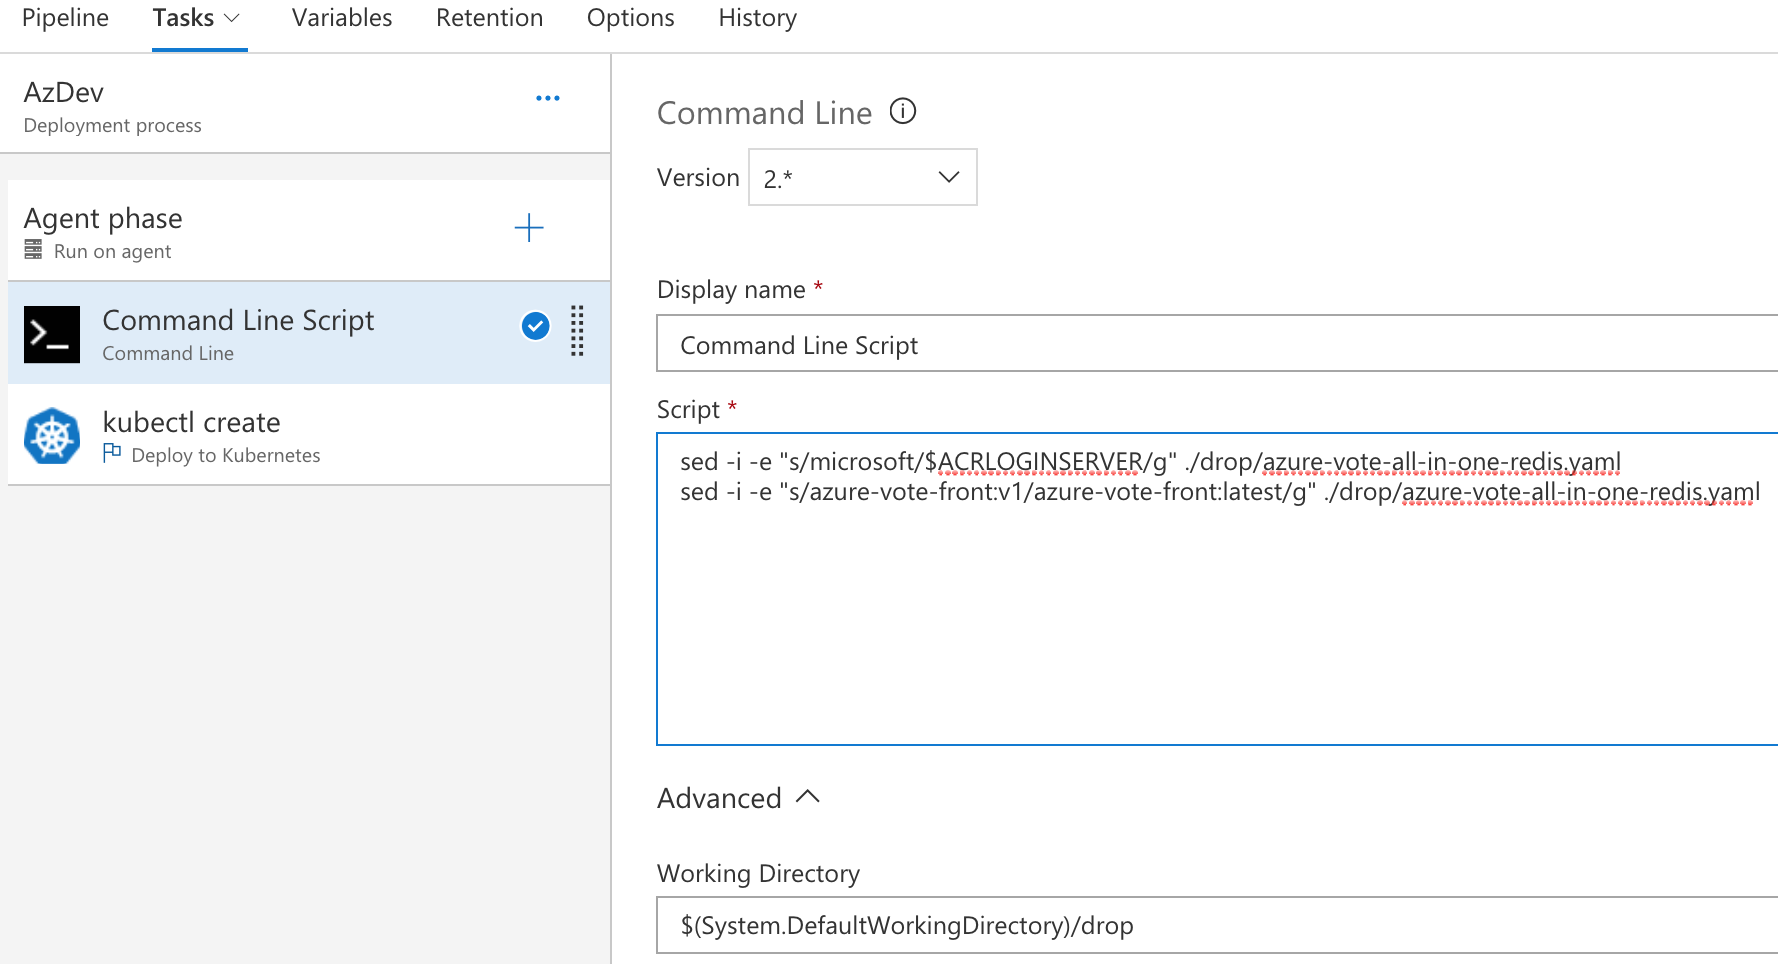
If you’re wondering what the h*ll we are doing here, we are changing the “image” specification (line 19 below) so that the later command that deploys to Kubernetes will pull the correct docker image from the repository. The first sed-command replaces “microsoft” for the value in my VSTS variable and the second sed-command changes “v1” to “latest”, since I prefer to deploy the latest docker image when the release pipeline runs.
apiVersion: apps/v1beta1
kind: Deployment
metadata:
  name: azure-vote-front
spec:
  replicas: 1
  strategy:
    rollingUpdate:
      maxSurge: 1
      maxUnavailable: 1
  minReadySeconds: 5
  template:
    metadata:
      labels:
        app: azure-vote-front
    spec:
      containers:
      - name: azure-vote-front
        image: microsoft/azure-vote-front:v1
        ports:
        - containerPort: 80
        resources:
          requests:
            cpu: 250m
          limits:
            cpu: 500m
        env:
        - name: REDIS
          value: "azure-vote-back"
Finally, remember that we are only modifying the temporary copy of the published artifacts from the Build step that resides on the agent while the pipeline tasks are running.
Deploy to Kubernetes
The Deploy to Kubernetes step is quite straight forward and we only need to specify some pretty obvious setting. When we did this step in episode 5, we did it with the simple kubectl command passing the YAML
kubectl create -f azure-vote-all-in-one-redis.yaml
As you can see below, we are doing very much the same. The trick is making sure we reference the temporary and modified copy of the YAML file on the host agent that runs the pipeline tasks.
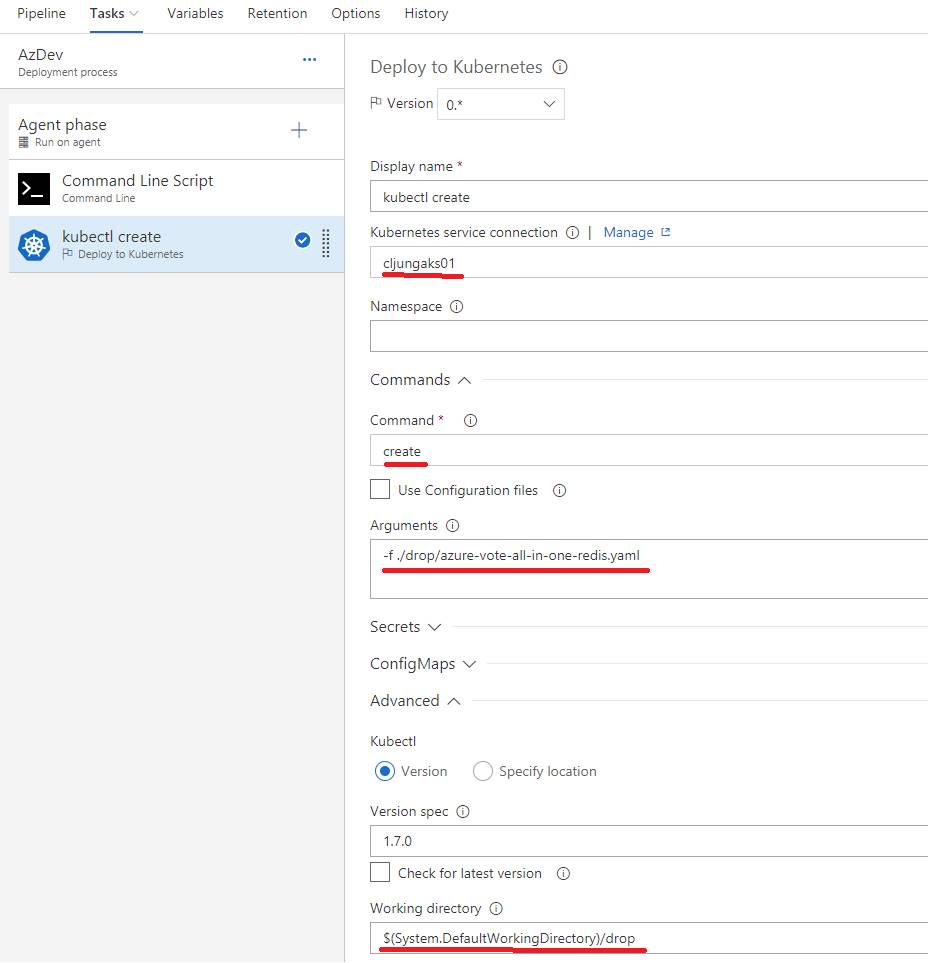
There also is another trick, which is more complicated, and that is configuring the “Kubernetes service connection”, since that is the connection string settings for how the kubectl command can reach and authenticate with the instance of Azure Kubernetes Service.
First, you need to run some Azure CLI commands to get hold of the connection string. The “az aks get-credentials” command will write the data we need to a text file named /.kube/config in your home directory. Open that file in a text editor and copy its entire content to the clipboard.
az aks get-credentials --resource-group $RGNAME --name $AKSCLUSTERNAME
Merged "cljungaks01" as current context in /Users/cljung/.kube/config
In VSTS, we need to create a “Service Endpoint” which is hidden in VSTS under the Settings-wheel in the top meny (gear icon some call it) and then under the “Services” menu item. Then, hit +New Service Endpoint and select Kubernetes.

You give it a name, enter the AKS server url that you can get from portal.azure.com and paste in the contents of your /.kube/config file. Make sure you verify the connection before you OK. My experience is that it you need to copy ALL of the kube/config file, you need to make sure the URL starts with “https” and that you accept untrusted certs.

With that, save everything and you’re ready to run the Release pipeline.
Running the Release Pipeline
You rune the Release pipeline by doing + New Release and then click Deploy, since the default is manual deploy and you have to kick it off. In reality, the tasks are quite trivial, since all we really do is running two sed-commands and one kubectl-command. However, sometimes less is more and VSTS shows its power when it comes to CI/CD.
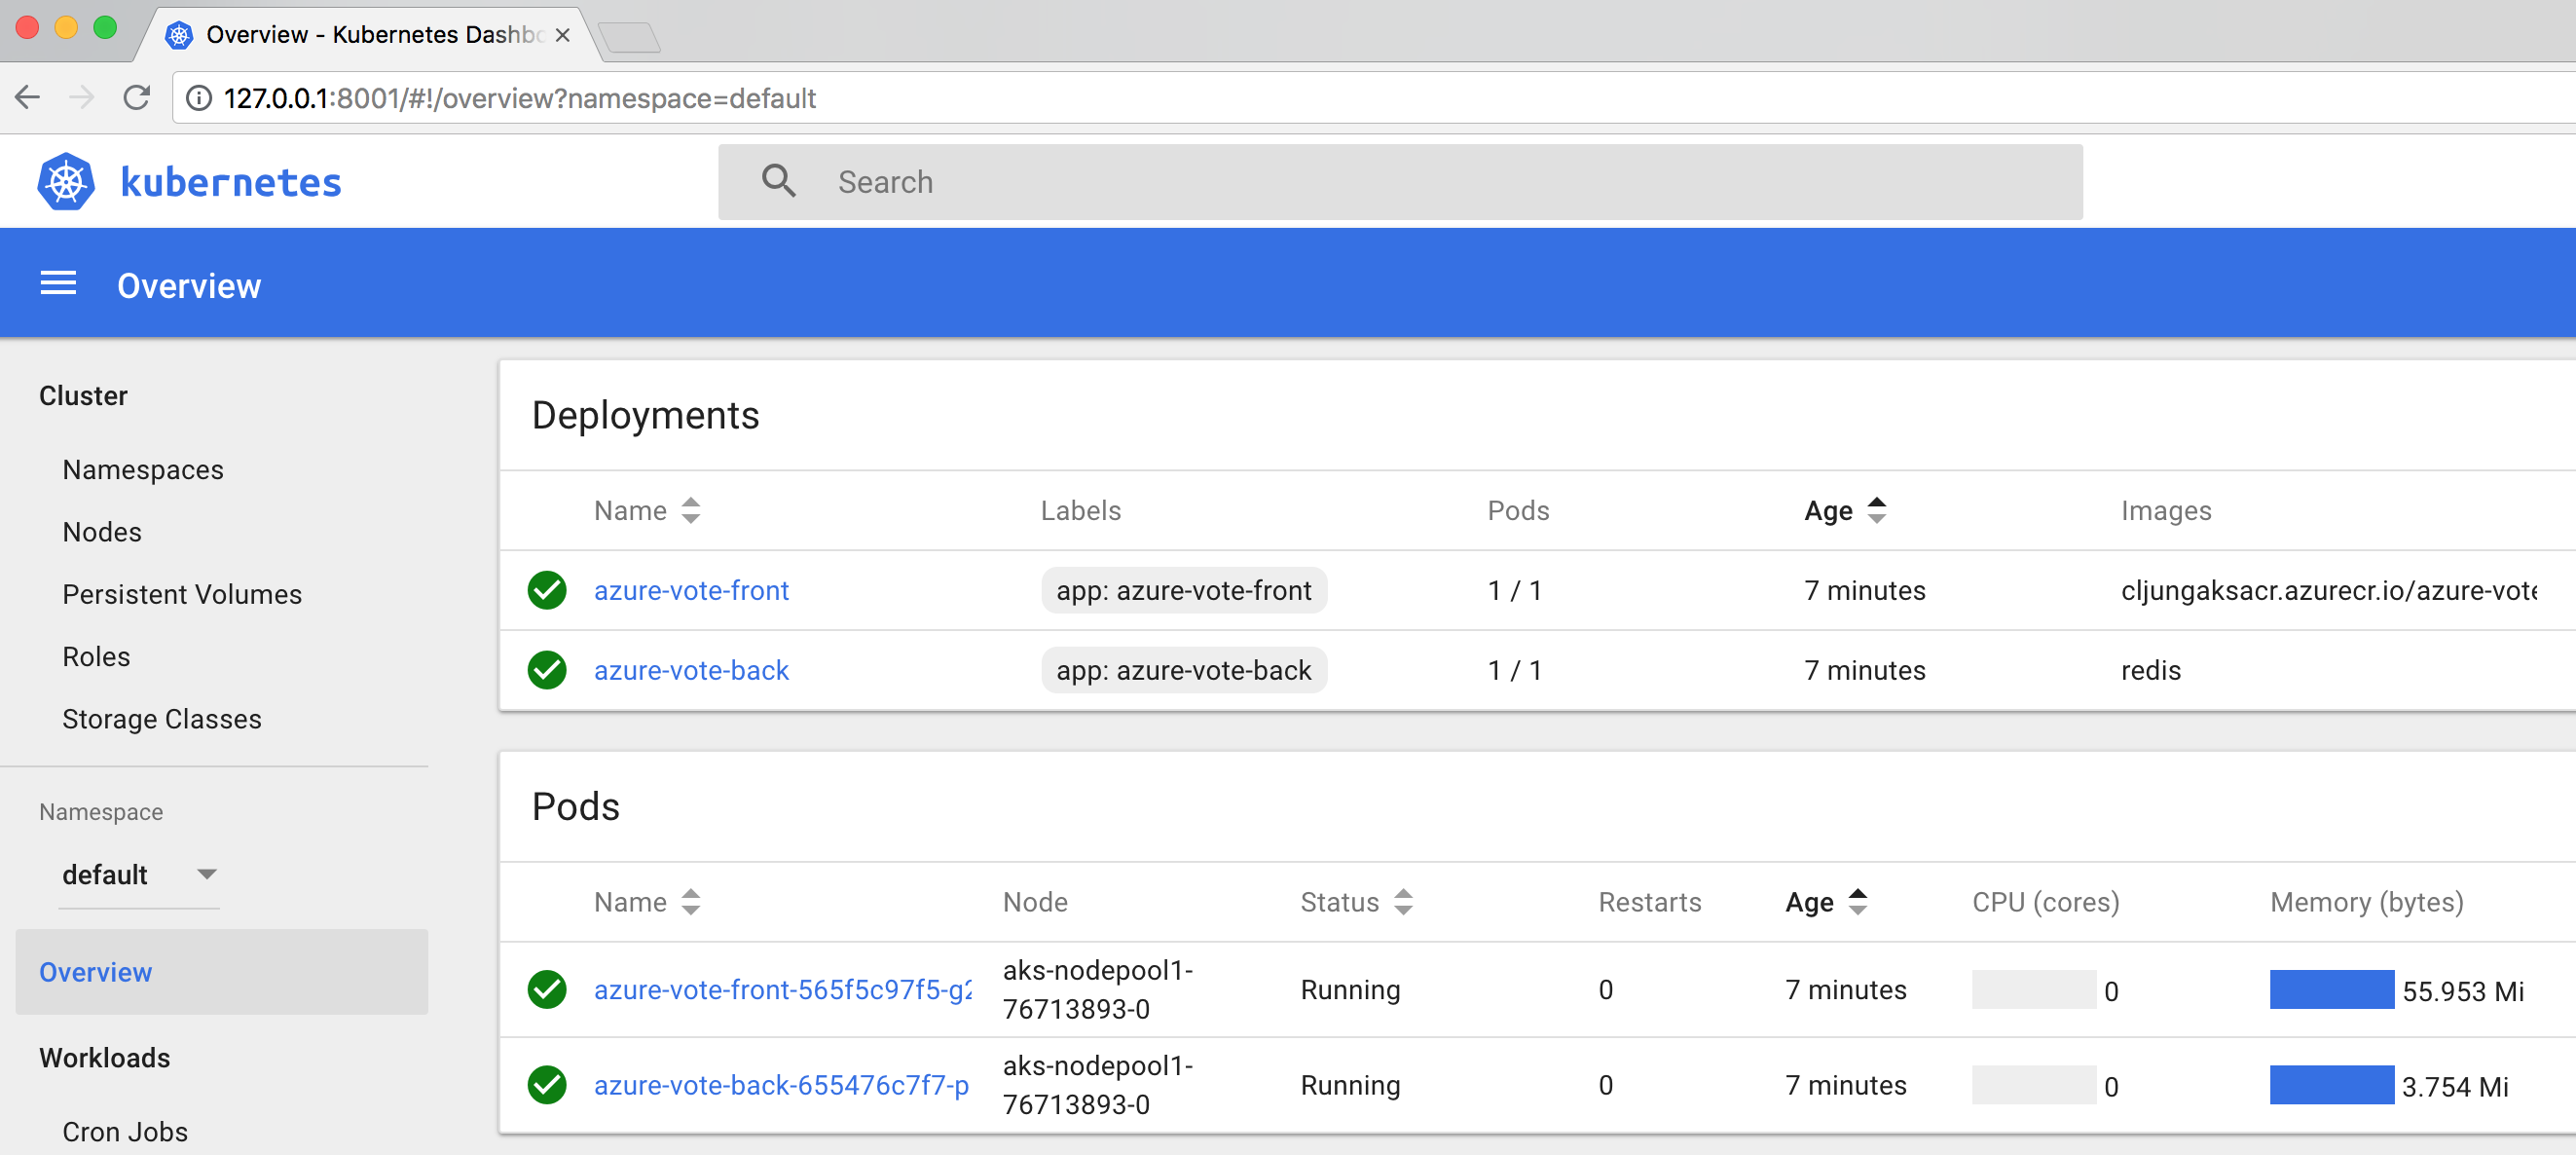
Accessing the Kubernetes Dashboard
Seeing is believeing, so we like to see that the Python WebApp has actually been deployed. That is a little tricky, since there is no direct link in portal.azure.com to launch it. You have to launch it locally on your laptop by running the Azure CLI command
az aks browse --resource-group $RGNAME --name $AKSCLUSTERNAME
Once you run that command, it will launch the dashboard from localhost on your laptop
Summary
So, with this step we are missioned accomplished. We have created a CI/CD pipeline that builds docker images of a Python WebApp, pushes them to Azure Container Registry and finally deploys the images as container apps on Azure Kubernetes Service. The scripting we did in episode 5 was really low level but achieved the same result over some 125 lines of code. With these two posts I’ve achieved the same result using VSTS. If what is said a bout Kubernetes is true, that it is hard and complex to get right, Azure’s managed Kubernetes Service together with VSTS makes it really simple.
In the next post, I’ll do the same but with a .NET Core WebApp, which will involve a few more tasks in the pipeline.