[DISCLAIMER: you should not use this solution anymore as B2C now uses Azure Front Door for custom domains]
A common request to Microsoft is having a custom domain when using Azure AD B2C for your CIAM solution. The host of the endpoint for the OIDC/OAuth2 authentication is yourtenant.b2clogin.com and even though it doesn’t say Microsoft all over it, brand sensitive companies want it to be login.contoso.com, or similar.
Microsoft has Custom Domain for B2C currently in private preview, but enrolling into that preview, if you are invited, takes time. If you need Custom Domain asap, perhaps to impress in a demo or for technical reasons, you can achieve this via proxying B2C via Azure App Services. The trick is configuring your AppService to do url rewrite from login.contoso.com to yourtenant.b2clogin.com. Since Azure AppServices supports configuring a Custom Domain, you can achieve what you want.
Deploy your Azure AppService
The documentation for deploying an Azure AppService that supports Custom Domains can be found here https://docs.microsoft.com/en-us/azure/app-service/app-service-web-tutorial-custom-domain. It is straight forward and all you need to take into consideration is:
- Make sure the pricing tier you select for the AppService Plan supports Custom Domain. The Free F1 doesn’t.
- Select OS Type Windows as you need IIS
- Select Runtime Stack ASP.Net v4.7.
Configuring the URL Rewrite rules
To make your AppService act like a reverse proxy, you need to edit the Web.Config file and add some rules and you need to add a file named applicationHost.xdt. The Web.Config exists in /site/wwwroot and applicationHost.xdt need to be in /site (ie, one level up). Adding these files is all you need to do. You need no other deployment to the AppService.
Web.Config
The full Web.Config file you need exists in github here. The default rewrite rule just takes all urls and rewrites then to be yourtenant.b2clogin.com. In your backend code, the hostname of the AppService will be passed in the x-original-host header.
<rule name="Proxy" stopProcessing="true"> <match url="(.*)" />
<action type="Rewrite" url="https://yourtenant.b2clogin.com/{R:1}" /> <serverVariables>
<set name="HTTP_X_UNPROXIED_URL" value="https://yourtenant.b2clogin.com" /> <set name="HTTP_X_ORIGINAL_ACCEPT_ENCODING" value="{HTTP_ACCEPT_ENCODING}" /> <set name="HTTP_X_ORIGINAL_HOST" value="{HTTP_HOST}" />
<set name="HTTP_ACCEPT_ENCODING" value="" /> </serverVariables></rule>
If you look in the complete Web.Config file, you’ll see that you have three outbound rules too to handle the rewrite of cookie domain names so that any cookie B2C emits for yourtenant.b2clogin.com gets passed to login.contoso.com. Otherwise SSO would break.
ApplicationHost.xdt
You don’t need to edit the applicationHost.xdt file, but one setting is really important and that is
reverseRewriteHostInResponseHeaders="false"
since without this setting, the URL rewriting is just a little too eager and will rewrite the redirect_uri parameter on the way out of the reverse proxy and your app would break as the redirect back would fail.
CORS
If you use B2C’s feature of hosting your own HTML pages, then you need to update your CORS rules, since it is not yourtenant.b2clogin.com that requests your HTML page anymore but login.contoso.com.
If you are using Azure Blob Storage for hosting your HTML, you have the documentation here https://docs.microsoft.com/en-us/azure/active-directory-b2c/custom-policy-ui-customization#3-configure-cors. You need to add https://login.contoso.com (or whatever your domain is called). If you just want to test via proxying thought AppServices, then add https://myapp.azurewebsites.net
Deploying your config to Azure AppServices
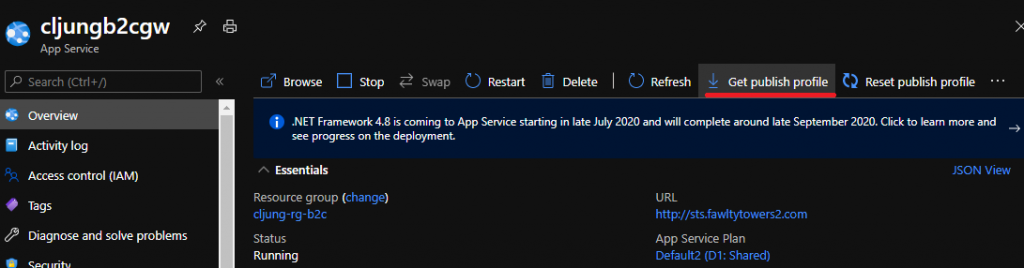
There are many ways to deploy the files, but if you like an easy and fast way, you can revert to using good old FTP. You will find the FTP credentials in the file you can download from Get publish profile menu item in portal.azure.com. In your FTP client, make sure you select passive mode as that is required.
You need to upload
- Web.Config –> /site/wwwroot
- applicationHost.xdt –> /site
Testing
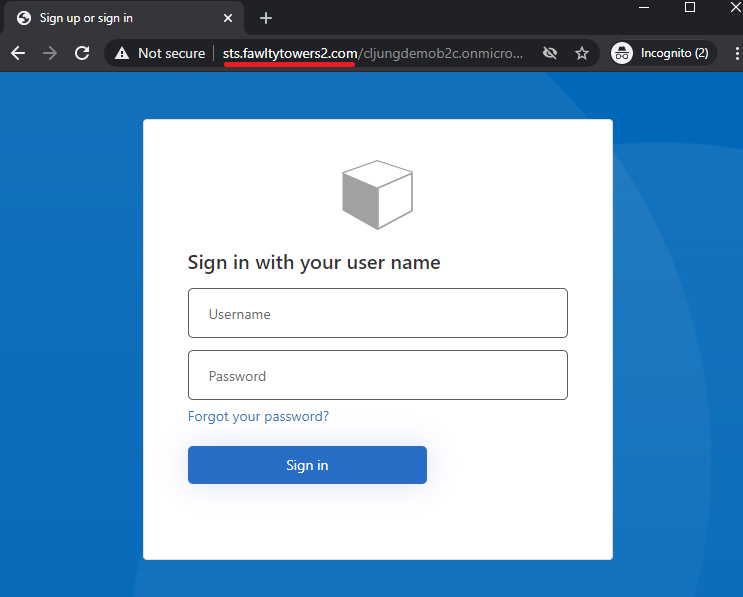
To successfully test this, you need to complete the steps in the documentation about how to configure a custom domain for AppServices. This includes having a DNS Admin to work with you as that is the way to prove that you own the domain. To complete the configuration, you need to upload a certificate for the domain, like login.contoso.com, but you can test it before and you just have to accept that your browser complains about the certificate.
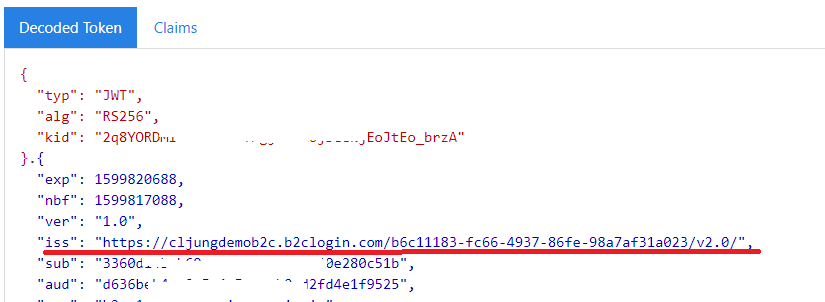
One thing to be aware of is that the JWT token that B2C issues does not reflect the domain name you configured for AppServices. The iss claim will state the yourtenant.b2clogin.com since AppService is only a reverse proxy in this solution. When you use B2C’s own Custom Policy in private preview, the iss claim will reflect that domain name.
But wait, there is more…
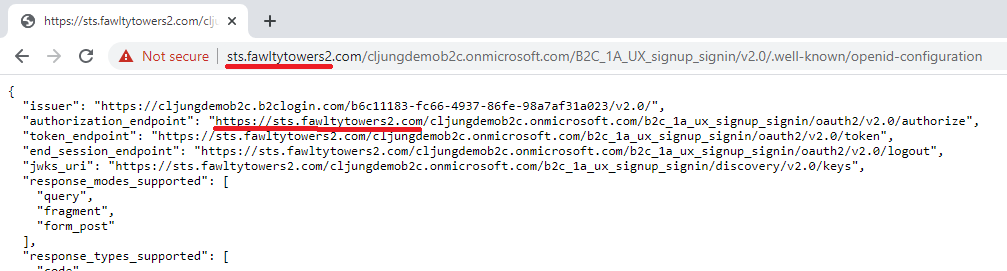
There is one more thing that you need to fix if you really want to use this solution from a real app and it is the result of metadata endpoint .well-known/openid-configuration. Since Azure AppServices is just a reverse proxy, the call to https://login.contoso.com/yourtenant.onmicrosoft.com/B2C_1A_signup_signin/v2.0/.well-known/openid-configuration will go through, but it will return values in authorization_endpoint, etc, that points directly to the B2C tenant. That means that your app will use these values when it redirects for authentication and you’re back to square one.
So how do we fix this…?
We add another rule in Web.Config that reroutes requests to /.well-known/openid-configuration to an Azure Function we have deployed and let that Azure Function call B2C’s metadata endpoint and modify the response before returning it.
<rule name="RedirectWellKnownOpenidConfiguration" stopProcessing="true"> <match url="^(.*)\/.well-known\/openid-configuration(.*)$" /> <action type="Rewrite" url="https://yourt-azfunc.azurewebsites.net/api/WellKnownOpenidConfiguration/?url=https://yourtenant.b2clogin.com{HTTP_URL}"/></rule>
We pass the original url for the metadata request in a query string parameter named url and pass the hostname we want to have in HTTP Header x-original-host
public static async Task<HttpResponseMessage> Run(HttpRequest req, ILogger log){ string url = req.Query["url"]; string originalHost = req.Headers["x-original-host"]; string[] parts = url.Split("/".ToCharArray()); string host = parts[2];
HttpClient client = new HttpClient(); HttpResponseMessage res = client.GetAsync(url).Result; var contents = await res.Content.ReadAsStringAsync(); client.Dispose();
if ( res.StatusCode == HttpStatusCode.OK ) { dynamic json = JsonConvert.DeserializeObject(contents); json.authorization_endpoint = ((string)json.authorization_endpoint).Replace(host, originalHost); json.token_endpoint = ((string)json.token_endpoint).Replace(host, originalHost); json.end_session_endpoint = ((string)json.end_session_endpoint).Replace(host, originalHost); json.jwks_uri = ((string)json.jwks_uri).Replace(host, originalHost); contents = JsonConvert.SerializeObject(json); } var content = new StringContent(contents, System.Text.Encoding.UTF8, "application/json"); content.Headers.Add("Access-Control-Allow-Origin", "*"); return new HttpResponseMessage(res.StatusCode) {Content = content};}
This produces the following metadata JSON response