There are plenty of examples out there for how to implement authorization in a REST API resource server in DotNet and I’ve also written about how you do it in Java in a post, but how do you do it in Python? Well it turns out you need to do more on your own, but the reward for doing it is that you also get closer to how authorizing via a JWT token issued by Azure AD actually works.
Scenario
The REST API shall require the “Authorization Bearer <token>” in the HTTP header, where the token is issued by Azure AD and where the requester of the token have specified the REST API’s resource id so that the token is signed and valid. The REST API also makes use of custom scopes to determined if the caller has Read and/or Write access to the resources provided by the API.
Validating JWT tokens
Roberto Prevato’s blog post Validating JSON web tokens (JWTs) from Azure AD, in Python describes in detail how you in Python code validate a signed JWT token issued by Azure AD. I have taken that code more or less as-is and put it in a file called jwtvalidator.py. My addition is that it dynamically downloads the well-known openid configuration and retrieves its discovery keys for the Azure AD tenant the REST API uses to protect itself.
You can do this yourself by browsing to https://login.microsoftonline.com/9885457a-2026-4e2c-a47e-32ff52ea0b8d/.well-known/openid-configuration (replace the guid by your tenant – or by ‘common’), copy-n-paste the json result into a json online formatter like https://jsonformatter.org/.
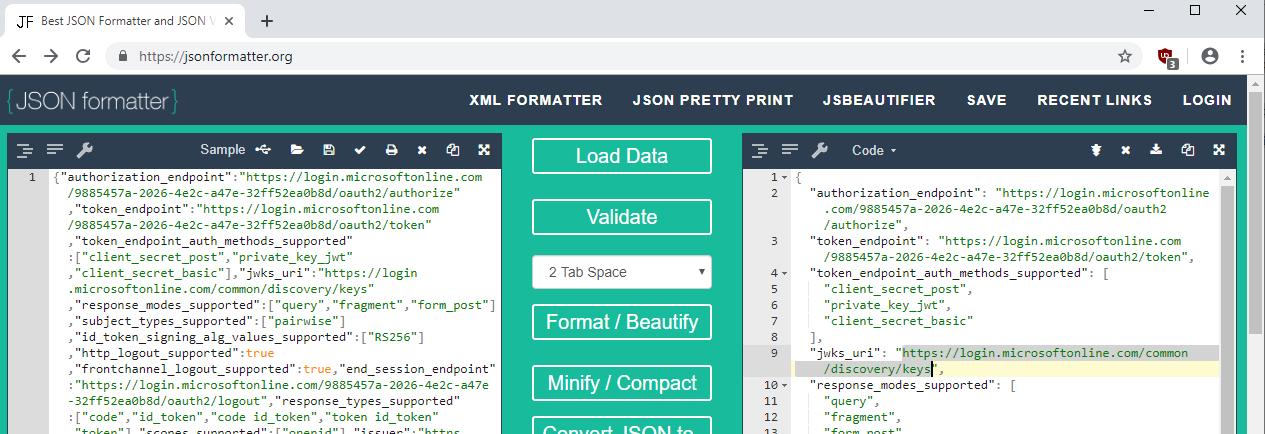
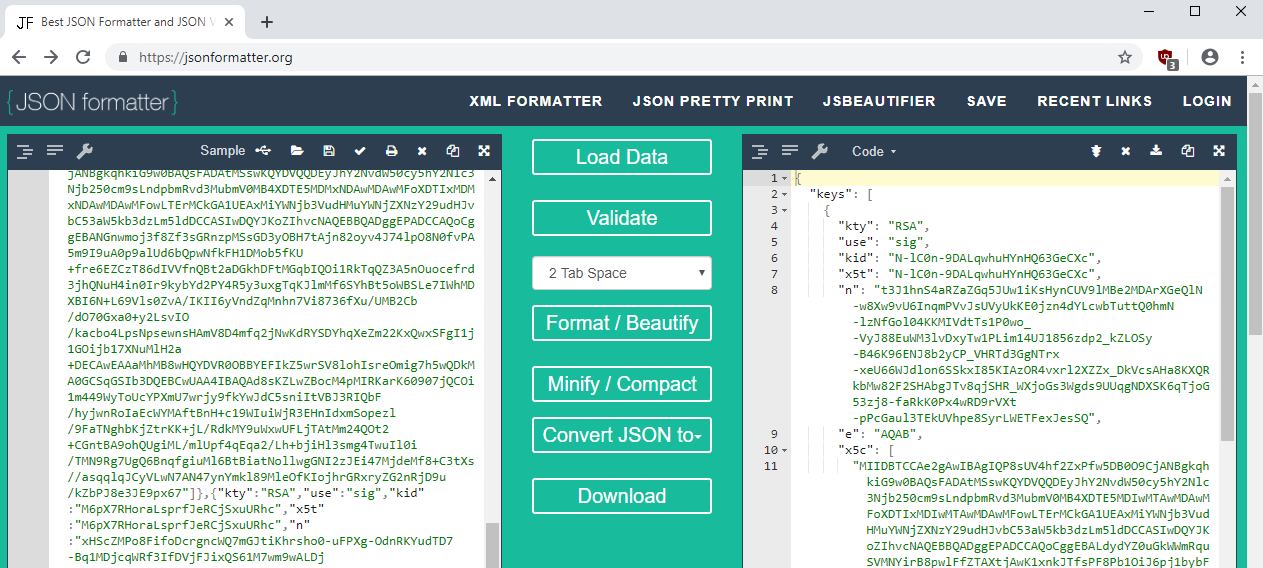
Then grab the value of jwks_uri and browse to it. That json response will contain the set of public keys that Azure AD uses to sign a JWT token, which means that the token we should validate must be signed with one of those keys – which means we have a way to validate the token.
Signed JWT token
A signed JWT token from Azure AD is a three part data separated by periods. If it hasn’t got three parts (two periods) it is not a signed JWT, but if it is, the first part is the header and tells you which of the possible keys where used to sign it. The second part contains the claims attribute and the third is the signature. If you have a signed JWT you can decode it online via jwt.ms to see its contents.
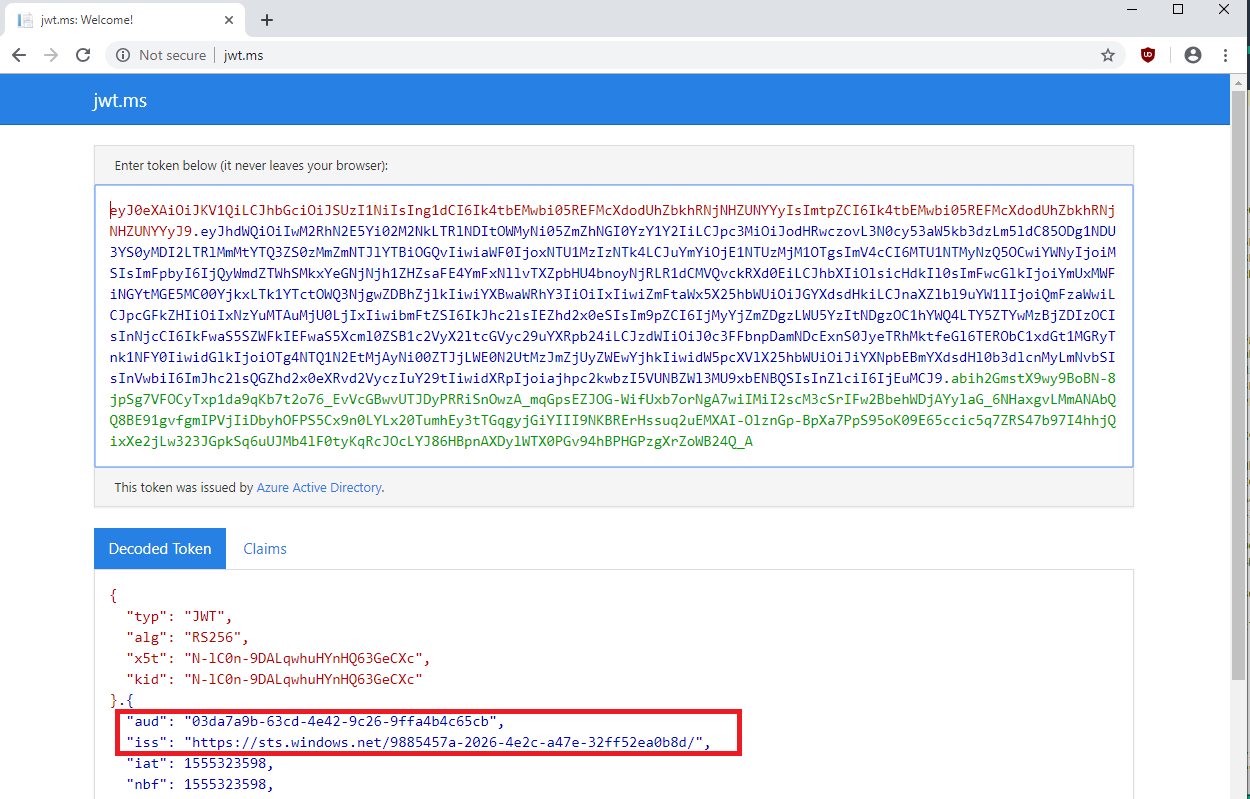
The kid attribute in the header must match any of the kid attributes in the jwks_uri response or else the JWT token wasn’t signed by this Azure AD tenant. The aud and iss claims are important, since it tells the audience and the issuer, where the audience must match the AppID of the REST API application entry in Azure ID and the issuer must be the Azure AD tenant that protects the REST API (where the app is registered). With this we have the data to verify that the JWT token was indeed issued and signed by the Azure AD tenant we trust.
Validating the JWT token in Python
At startup of the REST API, it grabs the values of the Azure AD tenant id and the AppID from environment variables. I use this method because that makes it easy to configure in both Kubernetes and Azure App Services
tenantId = os.environ['AZTENANTID']
appId = os.environ['AZAPPID']

jwtvalidator.initAzureAD( tenantId, appId )
Then the init methods makes calls to get the discovery keys as explained above and it sets up the issuer and audience attributes. This will be needed when validating the JWT token in each REST API call.
def initWellKnownConfig( urlWellKnown ):
    # get the well known info & get the public keys
    resp = requests.get(url=urlWellKnown)
    well_known_openid_config_data = resp.json()
    jwks_uri = well_known_openid_config_data['jwks_uri']
    # get the discovery keys
    resp = requests.get(url=jwks_uri)
    jwks.update( resp.json() )

def initAzureAD( tenantId, clientId ):
    global issuer
    global valid_audiences
    issuer = "https://sts.windows.net/" + tenantId + "/"
    valid_audiences.append( clientId )
    initWellKnownConfig( 'https://login.microsoftonline.com/' + tenantId + '/.well-known/openid-configuration' )
The validate_jwt code looks into the JWT token and gets the matching discovery keys that it was signed with, then it decodes the JWT token using the RS256 encryption algorithm that Azure AD uses together with the public discovery keys.
def validate_jwt(jwt_to_validate):
    public_key = get_public_key(jwt_to_validate)

    jwt_decoded = jwt.decode(jwt_to_validate,
                         public_key,
                         verify=True,
                         algorithms=['RS256'],
                         audience=valid_audiences,
                         issuer=issuer)

    # do what you wish with decoded token:
    # if we get here, the JWT is validated
    return jwt_decoded
Defining Application Scopes
To be more useful for each REST API method, I’ve wrapped all the heavy work into a method named checkAuthorization. This meathod also takes an optional scope that is needed so that we in one call can determind that the caller has the appropriate Read/Write permission.
# api that creates a new item
@app.route('/api/items/<id>', methods = ['POST'])
def createItem(id):
    jwt_decoded, resp = jwtvalidator.checkAuthorization( "Api.Write" )
    if resp:
       return resp

    # continue here if authorized ok
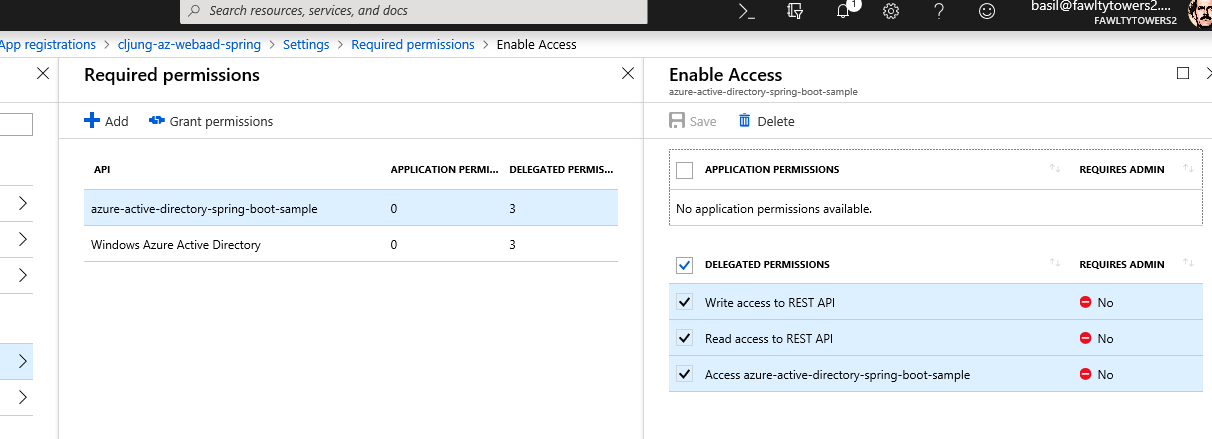
But where do these scopes come from? You define them in the manifest of the REST API application. It is basically just text and the content is well described in this blog post.
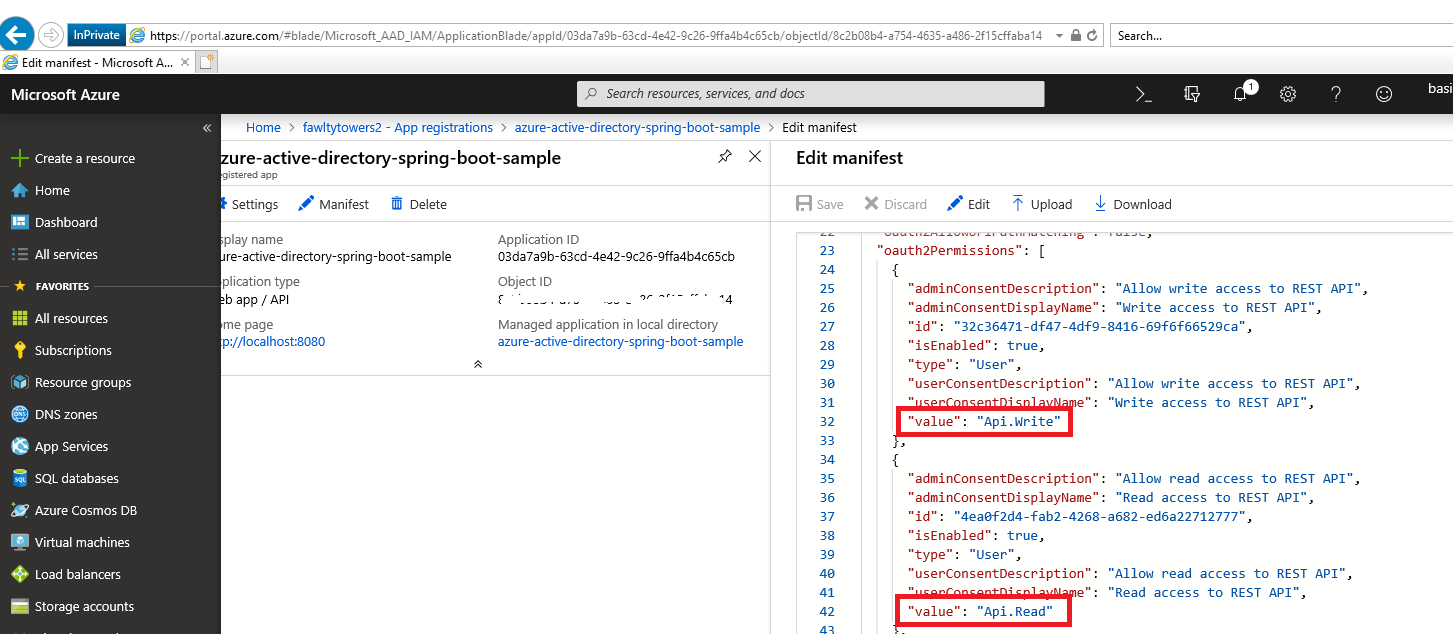
The value is of importance as it will be part of the JWT token as the attribute “scp”. All the scopes that an app has permission to will be in the scp attributed, separated by a space.

Delegating Application Permissions
The above describes how to define all permissions the RESP API implements, but how does the caller get it into the token? In order to understand this, you have to realize that we are dealing with not one but two Azure AD application entities – the caller and the callee. The callee is the REST API and the caller is whatever application that requests access to the REST API. One example of this would be where the callee is Azures management layer and the caller is portal.azure.com, the Azure CLI or the Azure Powershell cmdlets.
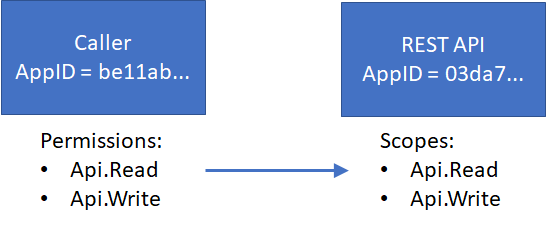
So, it is on the caller application we add access and request the Read/Write access.
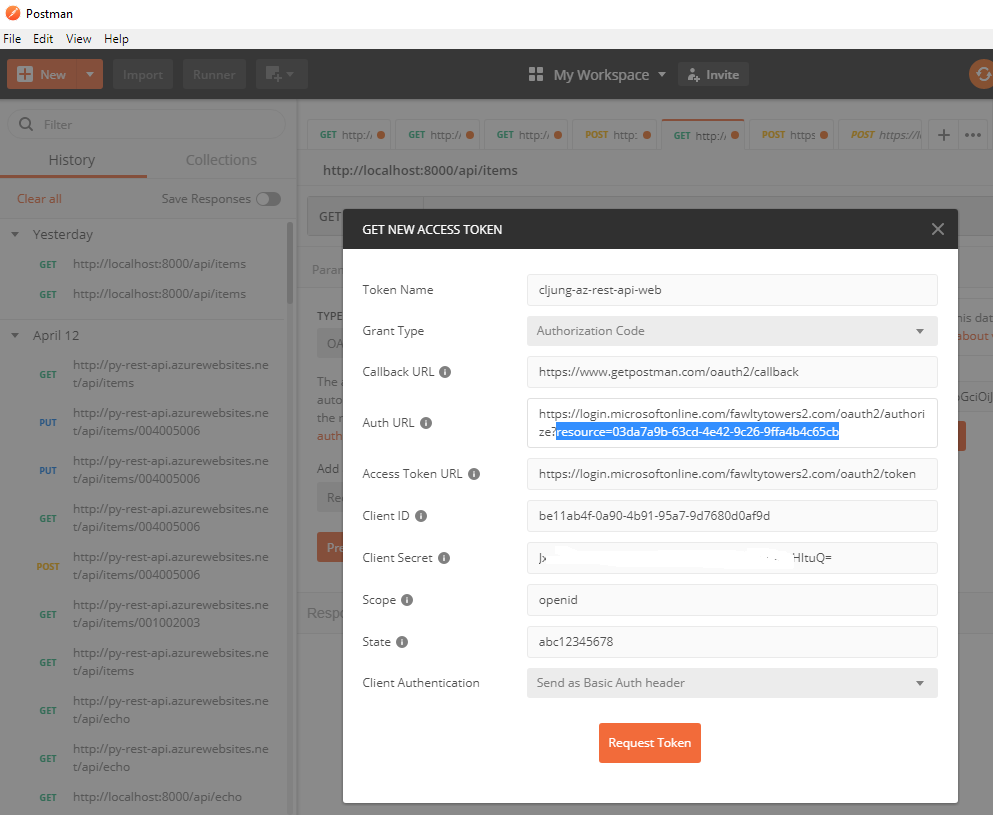
Putting it all together – requesting a JWT token
Putting it all together, I will use Postman as the caller application. In the OAuth authorization flow, we use the Grant Type “Authorization Code” and please note that the Auth URL contains the AppID of the callee, ie the guid of the REST API. This means that we will authenticate using whatever user credentials we pass, like userid/password, but request an access token valid for the resource guid. Since the caller has been configured in Azure AD to grant access to the callee, Azure AD will issue such a token.
Passing in a JWT access token that has passed its end-of-life should not work and as you can expect, the Python code doing the validation gives us a 401 Unauthorized with the message that the signature has expired. The caller should in this case use its refresh token and get a new access token and try again.

Summary
This has been a rather long post, but I hope you will find it useful. It goes through some really important topics in how you protect a REST API using Azure AD and doing it in Python is a more naked version than DotNet or Java that makes you see and learn more of what is going on under the covers.
References
github repo for sample code – https://github.com/cljung/py-rest-api
You can run it locally, in Azure App Service for Linux or Azure Kubernetes Services