Azure AD is the cloud version of Active Directory and there are plenty of examples of how to make a .Net based webapp using it as its authentication source. However, since Azure AD supports OAuth and OpenID, there is nothing stopping an Open Source based website from doing the same. In this blog post I’ll show you how a Django-based Python website running on an Ubuntu Linux server (in Azure) uses Azure AD as its authentication source.
Django 101
To be honest with you, I’m not a Django expert. To make this example easy to replicate, I followed the “Writing your first Django app, part 1” tutorial on the official Django website (see refs). I’ve managed to get this sample to work on both Windows, Mac and Linux. Only deviation from the tutorial was that I called my app “site1” and not “polls”. Follow the tutorial all the way to making it responding with “Hello world”. You can run the code on your laptop, but you need to have an Azure subscription in order to everything I will do in this post.
Registering the webapp in Azure AD
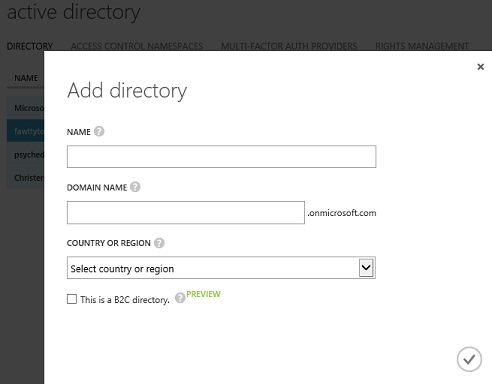
First of all, you need to decide which Azure AD tenant that will be the authentication source. If you are just trying this out, I suggest creating a new stand-alone AAD tenant. I created my lab AAD tenant called fawltytowers2 in my Azure subscription. If you do the same, please remember that you become the Global Admin of the AAD tenant when you create it (see my earlier blog – The Holy trinity of Azure).
When you have a AAD tenant, you create a new application and give it a name. The name is just internal to Azure and nothing you need in either config or expose publically.
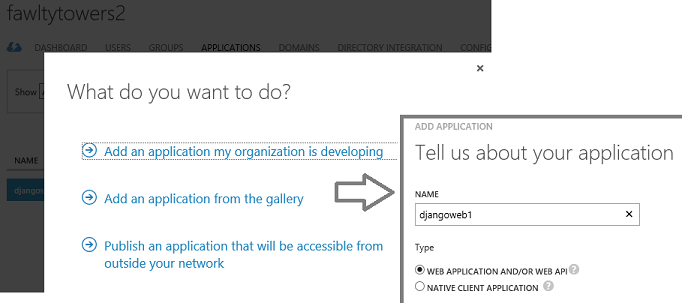
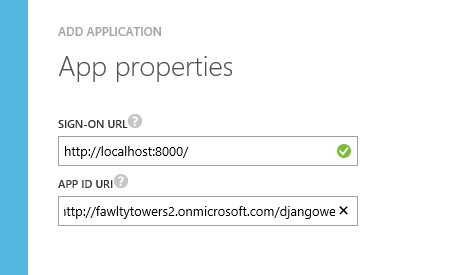
The Sign-on url need to match the url that the webapp is using, so if you run it locally it’s probably localhost and a port number, and if you deploy it to Azure, it is something like *.azurewebsites.net, *.cloudapp.net or similar. It can easily be changed, so don’t worry if you don’t get it right. The App ID uri is just an identifier in your directory and is most often the AAD tenant name with the app name appended.
Finally, you need to create a key and copy that together withe Client ID, because this you will need to add to your Python config.

All of the above is documented in many places and I included it here just for the sake of completness.
Modifying the Python code base to use Azure AD as authentication source
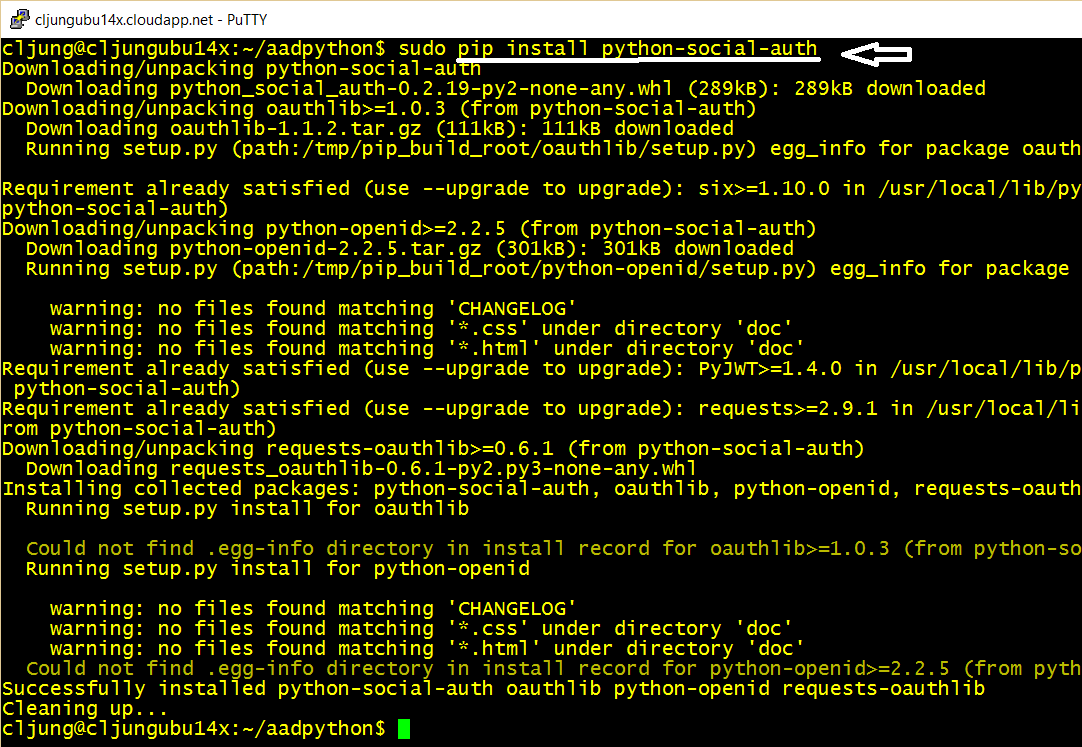
The first thing to do is to install the Python Social Auth implementation. This implementation exists on Github (see refs) and is a convenient way to add OAuth support to your Python website.
Then the settings.py file needs to be updated in a few places. The INSTALLED_APPS must add the ref to social.
INSTALLED_APPS = [
    'site1',
    'django.contrib.admin',
    'django.contrib.auth',
    'django.contrib.contenttypes',
    'django.contrib.sessions',
    'django.contrib.messages',
    'django.contrib.staticfiles',
    'social.apps.django_app.default',  <--- add this line
]
All of the below needs to be added at end of the settings.py file, where the SOCIAL_AUTH settings are the Client ID and the Client Key you copied from the Azure Portal.
AUTHENTICATION_BACKENDS = (
   'social.backends.azuread.AzureADOAuth2',
)
TEMPLATE_CONTEXT_PROCESSORS = (
   'django.contrib.auth.context_processors.auth',
   'django.core.context_processors.debug',
   'django.core.context_processors.i18n',
   'django.core.context_processors.media',
   'django.core.context_processors.static',
   'django.core.context_processors.tz',
   'django.contrib.messages.context_processors.messages',
   'social.apps.django_app.context_processors.backends',
   'social.apps.django_app.context_processors.login_redirect',
 )

LOGIN_REDIRECT_URL = '/'

SOCIAL_AUTH_AZUREAD_OAUTH2_KEY = '.....a1fcc2'         <-- Client ID
SOCIAL_AUTH_AZUREAD_OAUTH2_SECRET = 'uyr0.....fImw='   <-- Client Key
The main urls.py file needs to be updated to include the following so that the url handling for the logon procedure is passed to the Python Social Auth code.
from django.conf.urls import url, include
from django.contrib import admin
import django.contrib.auth.views

import site1.views

urlpatterns = [
    url('', include('social.apps.django_app.urls', namespace='social')),
    url('', include('django.contrib.auth.urls', namespace='auth')),
    url(r'^$', site1.views.index),
    url(r'^site1/', include('site1.urls')),
    url(r'^admin/', admin.site.urls),
]
Finally, you need to alter the views.py file to render the request correctly
from django.shortcuts import render
from django.http import HttpResponse
from django.template import RequestContext
from datetime import datetime

# Create your views here.
def index(request):
    #return HttpResponse("Hello, world. You're at the polls index.")
    """Renders the home page."""
    #assert isinstance(request, HttpRequest)
    return render(
        request,
        'index.html',
        {
            'title':'Home Page',
            'year':datetime.now().year,
            'request':request,
            'user':request.user
        }
    )
I’ve added a simple HTML template named index.html which is the only page of the website.
{% extends "layout.html" %}
{% block content %}
<div class="jumbotron jumbotron-bgcolor">
<h1>Python, Django and Azure AD</h1>
<p class="lead">This simple webapp demonstrates how a Django-based Python app uses Azure AD for authentication</p>
{% if user.is_authenticated %}
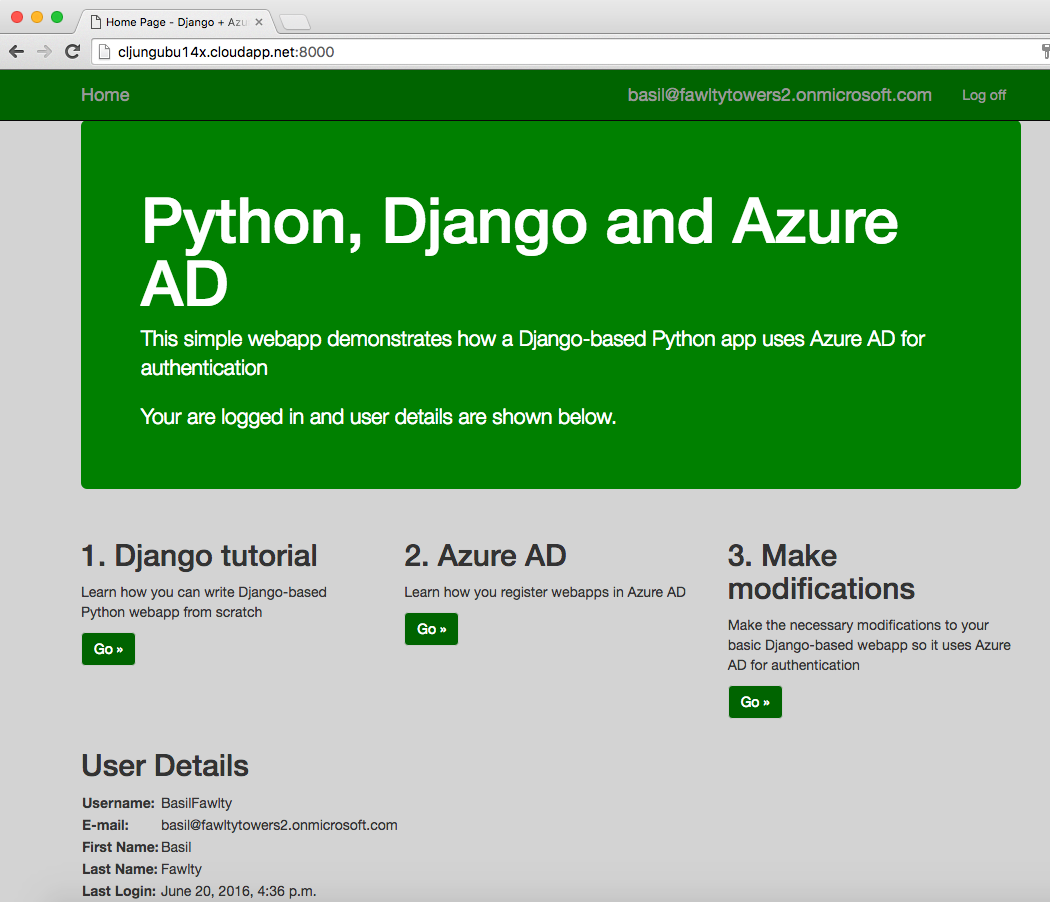
<p>Your are logged in and user details are shown below.</p>
{% else %}
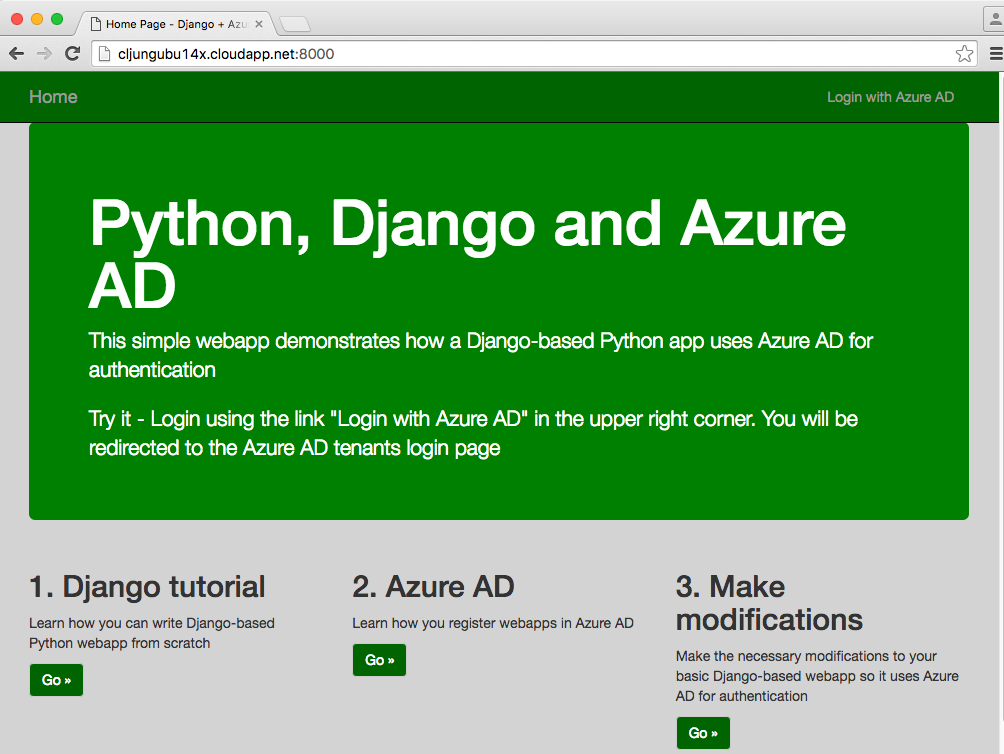
<p>Try it - Login using the link "Login with Azure AD" in the upper right corner. You will be redirected to the Azure AD tenants login page</p>
{% endif %}
</div>
<div class="row">
<div class="col-md-4">
<h2>1. Django tutorial</h2>
<p>
Learn how you can write Django-based Python webapp from scratch
</p>
<p><a class="btn btn-default btn-color" href="https://docs.djangoproject.com/en/dev/intro/tutorial01/">Go »</a></p>
</div>
<div class="col-md-4">
<h2>2. Azure AD</h2>
<p>Learn how you register webapps in Azure AD</p>
<p><a class="btn btn-default btn-color" href="https://azure.microsoft.com/en-us/documentation/articles/active-directory-integrating-applications/">Go »</a></p>
</div>
<div class="col-md-4">
<h2>3. Make modifications</h2>
<p>Make the necessary modifications to your basic Django-based webapp so it uses Azure AD for authentication</p>
<p><a class="btn btn-default btn-color" href="https://www.redbaronofazure.com/?p=7130">Go »</a></p>
</div>
</div>
<div class="row">
<div class="col-md-6">
{% if user.is_authenticated %}
<h2>User Details</h2>
<table>
<tr><td><b>Username: </b></td><td>{{ user.username }}</td></tr>
<tr><td><b>E-mail:</b></td><td>{{ user.email }}</td></tr>
<tr><td><b>First Name:</b></td><td>{{ user.first_name }}</td></tr>
<tr><td><b>Last Name:</b></td><td>{{ user.last_name }}</td></tr>
<tr><td><b>Last Login:</b></td><td>{{ user.last_login }}</td></tr>
</table>
{% endif %}
</div>
</div>
{% endblock %}
The logon/logoff code is handled in the loginpartial.html page. The social:begin part is the link that redirect the user to Azure AD for authentication.
 {% if user.is_authenticated %}
 <ul class="nav navbar-nav navbar-right">
   <li><span class="navbar-brand">{{ user.email }}</span></li>
   <li><a href="{% url 'auth:logout' %}?next={{ request.path }}">Log off</a></li>
 </ul>
 {% else %}
 <ul class="nav navbar-nav navbar-right">
   <li><a href="{% url 'social:begin' 'azuread-oauth2' %}?next={{ request.path }}">Login with Azure AD</a></li>
 </ul>
 {% endif %}
Authentication in action
I deployed the Django-based Python website to an Ubuntu webserver hosted in a classic Azure VM. When running the page, it presents you with the option of authenticating via pressing the link “Login with Azure AD”.
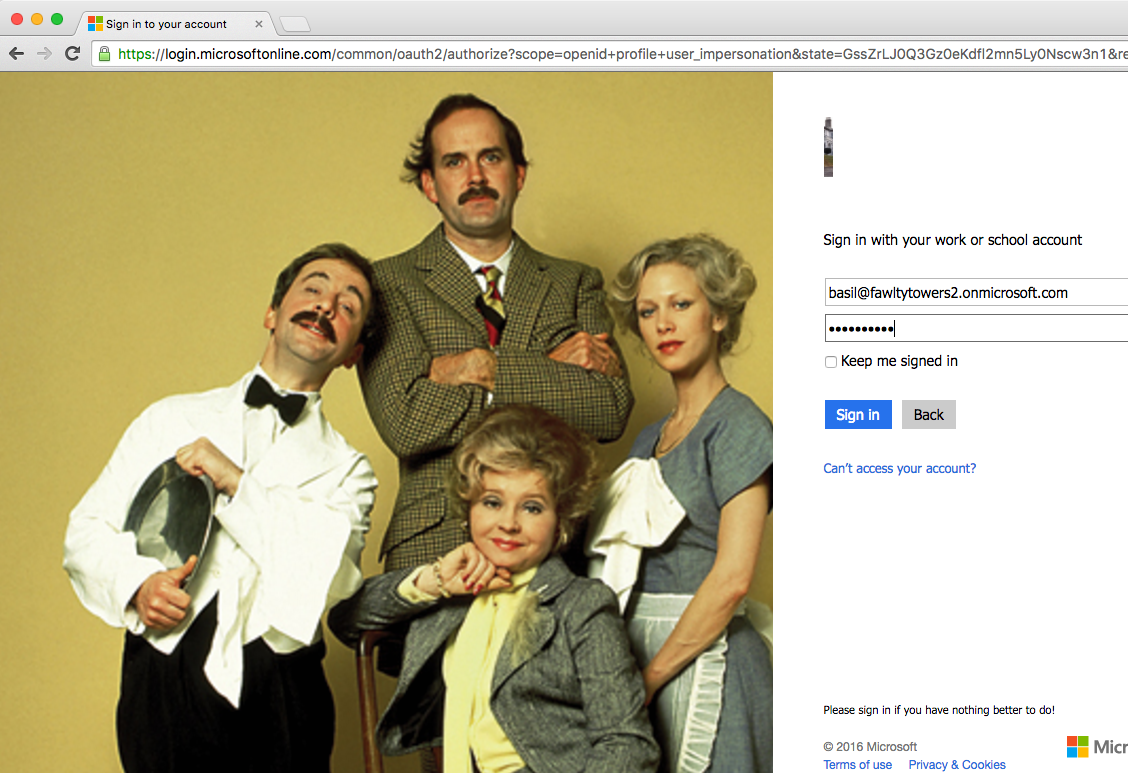
Clicking on the link directs you to Azure AD and in my case my fawltytowers2 AAD tenant (which I’ve decorated with a background image using the classic Azure portal). I present my user credentials to Azure AD which redirects me back to my website upon successful logon.
The page see’s that the user is authenticated and adds some of the user’s claims in the page output.
Summary
Azure is a Microsoft product but is far from Windows-only. Azure is a platform ready to host Open Source workloads and the adoption of it from the OSS community is happening rapidly as we speak. Active Directory is a center piece in many Enterprises’ infrastructure and with Azure AD in the public cloud, it reaches even futher beyond LDAP and Kerberos. Many examples and tutorial exists about how to make Azure AD the authenticating source for a .Net solution developed with Visual Studio, but Azure AD can in fact be of services to anything using OAuth and OpenID. The authentication configuration can include Multi-Factor Authentication or whatever the security policy requires. Adding Azure AD as the authentication source to Open Source webapps can be as easy as I showed in this example using this Django-based Python webapp.
References
Writing your first Django app, part 1
https://docs.djangoproject.com/en/dev/intro/tutorial01/
Github repo for Python Social Auth
https://github.com/omab/python-social-auth
Azure AD documentation – Integrating Applications
https://azure.microsoft.com/en-us/documentation/articles/active-directory-integrating-applications/
Azure AD – Code Samples
https://azure.microsoft.com/sv-se/documentation/articles/active-directory-code-samples/
Azure AD authentication for a Java-based webapp (you will find Node.js there too)
https://azure.microsoft.com/en-us/documentation/articles/active-directory-devquickstarts-webapp-java/
Source code